Java AWT Tutorial
Java AWT (Abstract Window Toolkit) is an API to develop Graphical User
Interface (GUI) or windows-based applications in Java.
Java
AWT components are platform-dependent i.e. components are displayed according
to the view of operating system. AWT is heavy weight i.e. its components are
using the resources of underlying operating system (OS).
The
java.awt package
provides classes
for AWT API such as TextField
, Label
, TextArea
, RadioButton, CheckBox
, Choice
, List
etc.
The
AWT tutorial will help the user to understand Java GUI programming in simple
and easy steps.
Java
AWT calls the native platform calls the native platform (operating systems)
subroutine for creating API components like TextField, ChechBox, button, etc.
For
example, an AWT GUI with components like TextField, label and button will have
different look and feel for the different platforms like Windows, MAC OS, and
Unix. The reason for this is the platforms have different view for their native
components and AWT directly calls the native subroutine that creates those
components.
In
simple words, an AWT application will look like a windows application in
Windows OS whereas it will look like a Mac application in the MAC OS.
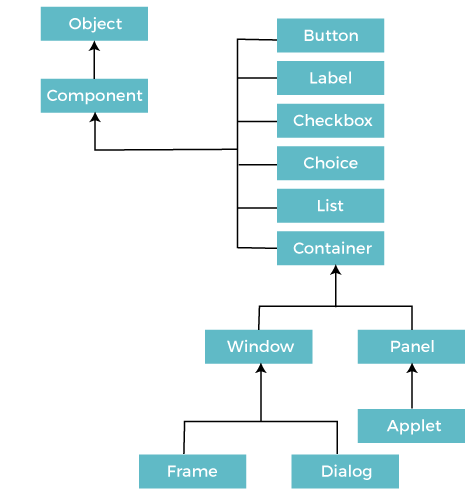
Java AWT
Hierarchy
The
hierarchy of Java AWT classes are given below.
The
hierarchy of Java AWT classes are given below.
Components
All
the elements like the button, text fields, scroll bars, etc. are called
components. In Java AWT, there are classes for each component as shown in above
diagram. In order to place every component in a particular position on a
screen, we need to add them to a container.
All
the elements like the button, text fields, scroll bars, etc. are called
components. In Java AWT, there are classes for each component as shown in above
diagram. In order to place every component in a particular position on a
screen, we need to add them to a container.
Container
The
Container is a component in AWT that can contain another components like buttons
, textfields, labels etc. The classes that extends Container
class are known as container such as Frame, Dialog and Panel.
It
is basically a screen where the where the components are placed at their specific
locations. Thus it contains and controls the layout of components.
Note: A container itself is a
component (see the above diagram), therefore we can add a container inside
container.
Types of containers:
There are four types of containers in Java AWT:
- Window
- Panel
- Frame
- Dialog
Types of containers:
There are four types of containers in Java AWT:
- Window
- Panel
- Frame
- Dialog
Window
The
window is the container that have no borders and menu bars. You must use frame,
dialog or another window for creating a window. We need to create an instance
of Window class to create this container.
The
window is the container that have no borders and menu bars. You must use frame,
dialog or another window for creating a window. We need to create an instance
of Window class to create this container.
Panel
The
Panel is the container that doesn't contain title bar, border or menu bar. It
is generic container for holding the components. It can have other components
like button, text field etc. An instance of Panel class creates a container, in
which we can add components.
The
Panel is the container that doesn't contain title bar, border or menu bar. It
is generic container for holding the components. It can have other components
like button, text field etc. An instance of Panel class creates a container, in
which we can add components.
Frame
The
Frame is the container that contain title bar and border and can have menu
bars. It can have other components like button, text field, scrollbar etc.
Frame is most widely used container while developing an AWT application.
The
Frame is the container that contain title bar and border and can have menu
bars. It can have other components like button, text field, scrollbar etc.
Frame is most widely used container while developing an AWT application.
Useful
Methods of Component Class
Method
Description
public void add(Component c)
Inserts a component on this component.
public void setSize(int width,int height)
Sets the size (width and height) of the component.
public void setLayout(LayoutManager m)
Defines the layout manager for the component.
public void setVisible(boolean status)
Changes the visibility of the component, by default false.
|
Method |
Description |
|
public void add(Component c) |
Inserts a component on this component. |
|
public void setSize(int width,int height) |
Sets the size (width and height) of the component. |
|
public void setLayout(LayoutManager m) |
Defines the layout manager for the component. |
|
public void setVisible(boolean status) |
Changes the visibility of the component, by default false. |
Java AWT
Example
To
create simple AWT example, you need a frame. There are two ways to create a GUI
using Frame in AWT.
- By extending Frame class (inheritance)
- By
creating the object of Frame class (association)
To
create simple AWT example, you need a frame. There are two ways to create a GUI
using Frame in AWT.
- By extending Frame class (inheritance)
- By
creating the object of Frame class (association)
AWT
Example by Inheritance
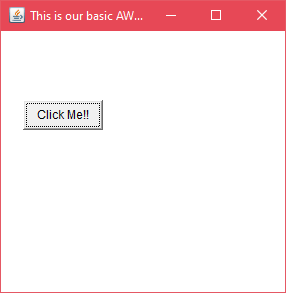
Let's
see a simple example of AWT where we are inheriting Frame class. Here, we are
showing Button component on the Frame.
AWTExample1.java
// importing Java AWT class
import java.awt.*;
// extending Frame class to our class AWTExample1
public class AWTExample1 extends Frame {
// initializing using constructor
AWTExample1() {
// creating a button
Button b = new Button("Click Me!!");
// setting button position on screen
b.setBounds(30,100,80,30);
// adding button into frame
add(b);
// frame size 300 width and 300 height
setSize(300,300);
// setting the title of Frame
setTitle("This is our basic AWT example");
// no layout manager
setLayout(null);
// now frame will be visible, by default it is not visible
setVisible(true);
}
// main method
public static void main(String args[]) {
// creating instance of Frame class
AWTExample1 f = new AWTExample1();
}
}
The
setBounds(int x-axis, int y-axis, int width, int height) method is used in the
above example that sets the position of the awt button.
Output:
AWT Example by Association
Let's
see a simple example of AWT where we are creating instance of Frame class.
Here, we are creating a TextField, Label and Button component on the Frame.
AWTExample2.java
// importing Java AWT class
import java.awt.*;
// class AWTExample2 directly creates instance of Frame class
class AWTExample2 {
// initializing using constructor
AWTExample2() {
// creating a Frame
Frame f = new Frame();
// creating a Label
Label l = new Label("Employee id:");
// creating a Button
Button b = new Button("Submit");
// creating a TextField
TextField t = new TextField();
// setting position of above components in the frame
l.setBounds(20, 80, 80, 30);
t.setBounds(20, 100, 80, 30);
b.setBounds(100, 100, 80, 30);
// adding components into frame
f.add(b);
f.add(l);
f.add(t);
// frame size 300 width and 300 height
f.setSize(400,300);
// setting the title of frame
f.setTitle("Employee info");
// no layout
f.setLayout(null);
// setting visibility of frame
f.setVisible(true);
}
// main method
public static void main(String args[]) {
// creating instance of Frame class
AWTExample2 awt_obj = new AWTExample2();
}
}
Output:
0 comments:
Post a Comment